This post is also available in: Português
A well-crafted email signature enhances branding and professionalism while serving as a marketing tool. By incorporating personalization, you can take your signature to the next level.
Hyper-personalized email signatures use dynamic elements that adapt to specific recipients and scenarios. Tools like the Bybrand make this possible.
This guide will walk you through creating a dynamic, hyper-personalized HTML email signature using Bybrand. Whether you’re a small business owner, marketer, or IT professional, our platform will teach you how to create personalized and visually appealing signatures.
What is a hyper-personalized email signature?
A hyper-personalized email signature is a dynamic signature that changes depending on specific conditions. It might incorporate employee-specific information, recipient-relevant content, or interactive elements like links to social media profiles.
Unlike static signatures, which are the same for every user, hyper-personalized signatures offer a tailored experience that makes emails feel more personal and engaging.
Key elements of a hyper-personalized signature
- Dynamic fields: These placeholders automatically pull information from a data source, such as the employee name, job title, or photo, and insert it into the signature.
- Conditional logic: You can set up logic that decides what content to display based on specific conditions, such as hiding a particular field if no user data is available.
- Interactive elements: Link to social media profiles, scheduling tools, or dynamic call-to-actions (CTAs) tailored to the recipient.
Why is personalization important?
Personalization in email communication builds stronger relationships with recipients. A personalized signature can make your email stand out, increase engagement, and leave a lasting impression. It also shows attention to detail, enhancing your company’s professional image.
In marketing, personalized elements in email communications can lead to higher conversion rates and improved customer loyalty.
For example, a marketing executive’s signature might include links to their LinkedIn profile or a CTA inviting the recipient to book a meeting directly through a dynamic scheduling link. The key benefit here is relevance, every recipient sees content specifically targeted to them, making the communication more effective.
Step-by-step guide to creating a hyper-personalized HTML signature
Now, let’s dive into the practical steps of building your hyper-personalized email signature using Bybrand:
Table of contents
Step 1: Introduction to dynamic elements
Bybrand is an email signature management that simplifies creating dynamic, hyper-personalized signatures. You can use dynamic fields, automation, and logic-based rules to personalize your signatures without needing deep technical knowledge.
Some key features of Bybrand include:
- Dynamic Placeholders: You can use placeholders like {{name}}, {{email}}, or {{photo}} to insert relevant information automatically.
- Automation: Bybrand can automate the creation and distribution of email signatures across your organization, ensuring consistent branding.
- Conditional Logic: The tool supports if-else logic, allowing you to tailor signatures based on conditions such as the presence of an employee photo or specific user data.
Dynamic elements work best with departments and automation features. Bybrand departments allow users to create unique email signatures for different departments within a company. The feature can include branding elements and promotional messages specific to each department.
Departments also streamline the creation of email signatures by adding placeholders that can be filled in at once.
To create a department, follow these steps:
- Click Automation, and then Create department:
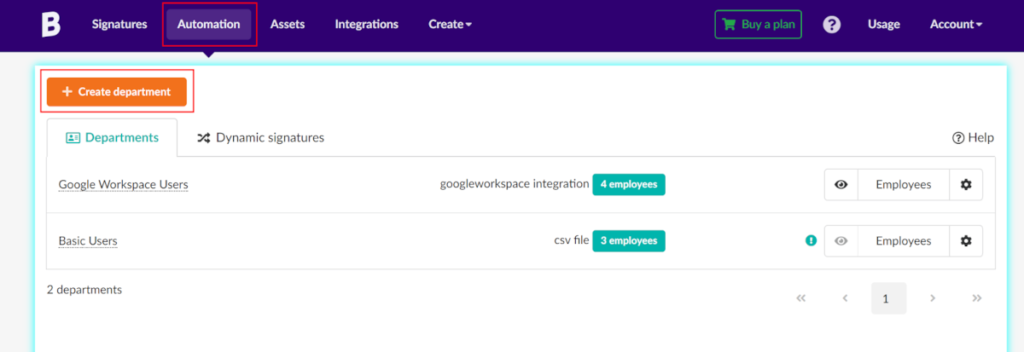
- Import your data using one of the available integrations or by CSV. Note, for the example CSV, we’ve left the Photo URL field blank as we cover image creation in a later step. However, for your use cases, you can provide image URLs here.
For this example, we’ll use the following structure:
CSV file example:
Name,Email,Department,Job Title,Photo URL

John Doe,johndoe@company.com,Marketing,Marketing Manager,

Jane Smith,janesmith@company.com,Sales,Sales Executive,

Michael Brown,michaelbrown@company.com,Support,Support Engineer,

Emily Davis,emilydavis@company.com,Development,Software Developer,

Chris Johnson,chrisjohnson@company.com,HR,HR Manager,- Associate this department with your newly created email signature template.
- Congratulations, we now have a department!
Step 2: setting up the base HTML email signature
Before we add personalization, creating the base structure of your HTML email signature is essential. This will include basic elements like the employee’s name, job title, and contact information.
- Log in to Bybrand: Start by logging into your Bybrand account and opening the email signature editor:
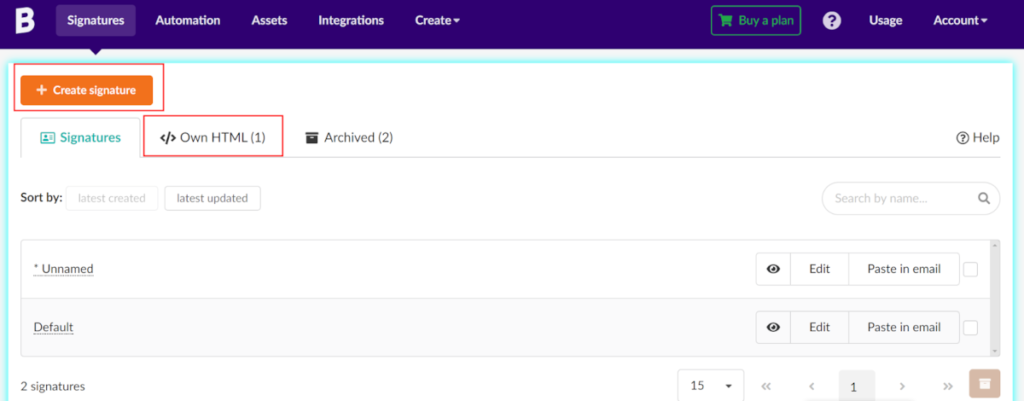
- Create the base signature structure: Select Own HTML to use your HTML to define the signature.
Note that placeholder fields also work in normal signatures. And not just with your own HTML.
Here’s a simple HTML structure for a base email signature:
<table>

<tr class="signRow">

<td style="line-height:18px;">

<strong>John Doe</strong><br>

<em>Marketing Manager</em><br>

<a href="mailto:johndoe@company.com">johndoe@company.com</a>

</td>

</tr>

</table>- Style the signature: Use inline CSS to style your signature according to your brand guidelines.
<table>

<tr class>

<td style="line-height:18px;">

<strong>John Doe</strong><br>

<em>Marketing Manager</em><br>

<a href="mailto:johndoe@company.com">johndoe@company.com</a>

</td>

</tr>

</table>
At this stage, we have an email signature appearing with the following style:

Step 3: Adding dynamic placeholders
With the basic structure in place, it’s time to add dynamic placeholders that will automatically pull in data, such as the employee’s name, job title, and photo. This is where the real power of personalization features shines.
A key component of many email signatures is the employee photo. You can use dynamic placeholders to display each employee’s photo. If no photo is available, Bybrand can insert a fallback image, such as the company logo.
First, navigate to Assets to provide some photos for your users:

Here are some important rules to remember for your images:
- All images must have dimensions of 100px width by 80px height.
- All image URLs must start with: https://a.bybrand.io/.
Next, go back to your department and add a photo of each team member:

Note how the fields for each employee correspond to the data you imported when setting up the department. For this example, we’ll leave one employee without a photo to demonstrate the conditional logic that ties in with the dynamic placeholder functionality.
To add the dynamic placeholders, edit the signature that applies to our department:

Update the HTML to include a placeholder tag for fields that correspond to our user data:
<table>

<tr class>

<td style="line-height:18px;">

<strong>{{Name}}</strong><br>

<em>{{Job-Title}}</em><br>

<a href="mailto:{{Email}}">{{Email}}</a>

</td>

<td>

{{Photo_URL}}

</td>

</tr>

</table>
In this example, Bybrand displays the employee data from the CSV we provided earlier:

Congratulations! We have successfully set up dynamic images that change based on user data. However, what happens with our employee who does not have an image?
A broken image is displayed if the {{Photo_URL}} placeholder is empty. Thankfully, we have a solution to this issue. Using conditional logic, we can show the company logo if the photo is missing.
Step 4: Applying conditional logic for dynamic content
We can apply conditional logic to dynamic content to account for missing data in our department. In this example, Bybrand will display the company logo if the {{Photo_URL}} placeholder is empty.
This ensures that the signature always looks complete, even if some employee data is missing. Update our example code to:
<table>

<tr class>

<td style="line-height:18px;">

<strong>{{Name}}</strong><br>

<em>{{Job-Title}}</em><br>

<a href="mailto:{{Email}}">{{Email}}</a>

</td>

<td>

{{#Photo-URL}} {{Photo-URL}} {{/Photo-URL}}

{{^Photo-URL}}
<img src="https://a.bybrand.io/clone-66a7b0e7a800f.png"      style="display: inline-block; vertical-align: middle; margin: 0px; float: none; max-width: 600px; text-align: center; padding: 0px; border: none; width: 100px; height: 80px;" width="100" height="80">

{{/Photo-URL}}

</td>

</tr>

</table>
We’ve made two important changes to our placeholder Photo-URL:
{{#Photo-URL}} {{Photo-URL}} {{/Photo-URL}}:We wrapped our placeholder in a dynamic conditional. This section {{#…}}) Only renders a block of text or HTML if a particular value or condition is true, exists, or is non-empty. ****In this example, the use of {{#Photo-URL}} hides the image if no image can be found in the user data.{{^Photo-URL}} <img>... {{/Photo-URL}}:We wrapped our placeholder in a dynamic conditional. The use of {{^Photo-URL}} Is called an inverted section. An inverted section ({{^…}}) is used to display a block of text or HTML only if a particular value or condition is false or missing. In other words, it checks if a value is either false, null, or empty, and if so, the content inside the inverted section is rendered. No{{Photo-URL}}is found in this case, so Bybrand displays the image inside the block: https://a.bybrand.io/clone-66a7b0e7a800f.png.
Let’s test the result of these changes!
Step 5: Testing your hyper-personalized signature
Before deploying your signature across the organization, it’s essential to test it. Bybrand lets you preview and test signatures to ensure they work as expected. Make sure to check:
- Dynamic placeholders: Are the correct data fields populating?
- Conditional logic: Are the if-else statements functioning correctly?
- Visual appearance: Does the signature look good across email clients like Gmail and Outlook?
Let’s take a look at our final version:

We’ve achieved impressive functionality in a few lines of code for our signature. Imagine applying this across an entire organization consisting of many different employees.
Conclusion
Creating a hyper-personalized HTML email signature using Bybrand is a powerful way to enhance your brand’s professionalism and engage with your audience on a more personal level. You can quickly scale personalized email signatures across your entire organization by leveraging dynamic placeholders, conditional logic, and automation.

Create your first email signature with Bybrand
Bybrand offers the ability to generate, administer, and distribute essential email signatures for your employees.